Saturday, April 19, 2014

Cabled Pacifier Leash

Cabled Pacifier Clip


My husband is fond of saying “If it sits around long enough, she’ll knit something for it.” 
 He MAY have a point.
 
-Materials:
7/8 inch Suspender Clip
Fingering weight yarn (I used leftover sock yarn)
US 1 ½ or 2.5mm DPNs or Magic Loop
US B or 2.5mm Crochet hook
Cable Needle
Tapestry needle (to weave in ends)

-Skills Needed:  (Check YouTube for refreshers)
Knit / Purl
Single Crochet
Picking Up Stitches
Basic Cable Crosses
SSK / K2tog
3 Stitch Icord
Center Pull Ball (not necessary, but handy)


Cast On
Create a slip knot and put it on the crochet hook. Put hook through the “eye” of the clip and pull up a loop. Wrap yarn and pull through both loops. Repeat around eye.


Fill the clip with single crochet. The number of stitches aren’t important. 

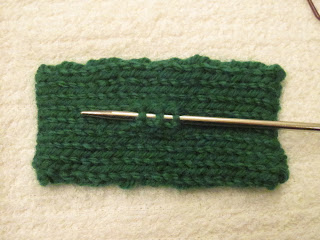
Locate the rough center of crocheted stitches. Count back six stitches to the right. Pick up and knit 12 stitches. Turn work and purl back.

 
The picture shows 10 sts, but 12 is the correct number.

Kf/b in all 12 sts (24 sts) Divide stitches as follows: Knit the first six stitches onto an extra needle or stitch holder, Knit 12 stitches (this will be the “front.) Use a new dpn or the other side of the Magic Loop to knit the next six stitches and the held six stiches this will be the “back” 

Leash Body
This is knit in the round like a thin tube. The work is knit on the front side, and then repeated for the back side (Like a sock.) You can use DPNs, but I found them too fiddly with the cables.


Basic Braided Cable
R1- K1, P2, C2F, K2, P2, K1
R2- K1, P2, K6, P2, K1
R3-K1, P2, K2, C2B, P2, K1
R4-K1, P2, K6, P2, K1

C2F-Slip 2sts to a cable needle and hold in front, K2, Knit the 2 cable sts.

C2B-Slip 2sts to a cable needle and hold in back, K2, Knit the 2 cable sts.

Work to desired length.

Decreases
Row 1-SSK, knit to two sts, K2tog
Row 2-Knit all sts


Repeat these two rows till you have four sts on needle


I-cord Ties
Divide the stitches into two groups of four. Decrease to 3 stitches (k1, k2tog, k1)
Knit i-cord to desired length. (3-4 inches)

Tip: Make a center pull ball with your yarn. Knit both i-cords at the same time by making the second tie with the outside end.


Finishing Off
Slip first stitch, K2tog, Pass Slipped stitch over. Cut yarn and pass it through loop. Weave in ends. Repeat for second i-cord. 

Sew up the bottom of the tube (by the clip) with the tail.


Tie on the paci...and plug it in.


Baby Carolyn - 11wks


Another cute pattern is the Hugs and Kisses Braid
http://www.knitting-and.com/knitting/patterns/afghans/hugsnkisses.htm


Enjoy! And let me know if you need clairification on anything.
Love,
Ang

Friday, April 18, 2014

Polar Fleece Blankets


Crocheted Polar Fleece Blanket

These are so quick and easy, you'll be eager to make one for everyone you love.

Crochet Hook G
Yarn Weight- Worsted Weight.

On the bolt, this measures 72”. I used a yard of it. So my finished size is 36” x 68” (you should cut off the selvage)

PATTERN:
Note: I crocheted into the spaces between the stitches..not into the chain on
top.

-Round off the corners - it makes it easier to crochet around them.

-Row 1 - Punch holes every 1/2 inch (There is a rotary cutter for
this.) and single crochet into the holes. I just marked around with a ruler and used sharp scissors to punch a hole for the needle to go through.

-Row 2 - Sl St in 2 spaces, 5dc - Repeat around.


Weave in ends. Easy peasy!

Now that you have the basics down, go crazy with different crocheted/knitted edgings!

Bobby Pin Bow Tie


Bobbypin Bowties


Bow ties are NOT a new idea and I'm not taking any kind of credit for "inventing" them. But I was unable to find a cute bow tie pattern for a toy monster I was knitting, so I re-vented it.(As Elizabeth Zimmermann would say) 

Happy Knitting :)

---

Gauge isn't important. Use the yarn/needle that gives you a good density.

Helpful Videos
-Magic Loop:
-Judy's Magic Cast On:
-Kitchener's stitch
-I-cord


Sample was made with a 3.25mm  (3US) Magic Loop and Sport weight yarn.

Body of Bow tie
1) Cast on 9 stitches/needle using the Magic Cast On. (18 sts total)

-or however tall you wish your bow tie to be-


2) Knit for 23 rows (or however wide you wish your bow tie to be)


3) Kitchener bind off and sew in ends.

Center
Choose a "good" side and put that face down.

1) Pick up 3 stitches from the center of the bow tie back.


2) Make an I cord long enough to fit snugly around the bow tie.


3) Flip bow tie over to Right side (non i-cord side) Pinch in center and bring both sides to center. Wrap i-cord around center of Bow tie and flip the whole thing over to the i-cord side again. (don't let go, it's very fidgety right now)


4) Cut Yarn and thread tapestry needle. Pass needle through base of i-cord and first stitch. Drop first stitch off of needle. Pass needle through base of the i-cord and second stitch. Drop second stitch off. Continue with third stitch. When all stitches are off of needle, secure the yarn end  and trim extra.


(back of bow tie after stitches are sewn to the base of the i-cord)

5) Insert Bobby pin or Clip.


6) Teach your friends how to make one (Because they ARE going to try and take it out of your hair!)

Any questions? If so, please feel free to ask.
Love, Ang

This prototype was crafted with sock yarn and a 2.5mm needle.


Elephant Magnets

A girlfriend came to me with a picture. This is my interpretation of it. :o)


Side View:


Worsted Weight yarn
Size G hook

(These are very forgiving...use whatever yarn/hook combo you want to
get the density you wish!)

Ch 4 sl st to form ring
R1: Ch3, Dc 15 into center hole, sl stitch to top of ch3 (16Dc)

R2: Ch2, Dc in same stitch, 2 Treble in next 2st, 2Dc in next stitch.
slip stitch down side of ear and in next next 4 sts. Chain 3 and Dc
in same stitch, 2Treble in next 2 sts, 2Dc in next stitch. Slip stich on
back of elephant to the center hole.

TRUNK OPTIONS
Chain 10. Cut yarn and weave in end for a soft, floppy trunk. Pull trunk
through center hole to the front.

For firmer Trunk- Chain 11. sc in 2nd stitch from the hook and each
stitch down. (10sc) Cut, weave in yarn end and pull through front.

For curly Trunk- Chain 11. sc in 2nd stitch from hook, *ch1, sc in
next stitch* Repeat till you have sc in each chain stitch. Cut, weave
in end, and pull through center hole.


FINISHING:

Sew button eyes or hot glue google eyes. Hot glue a magnet to the back or use as an applique.

Have fun and take care! Love, Ang

Google Plus...you suck! (AKA new Blog)

I took a three year break from blogging. And in that time, Google took over the internet. I remember the old Blogger account username and password. But now you can ONLY sign in through your Google account. I've spent HOURS in the "help" maze only to be dumped back at the beginning. So...6 years of blogging...GONE!

*gnaws arm off*

I'm going to try and reblog my Ravelry.com patterns. Wish me luck

Love, Ang